Epic Seven Azmakalis Says Cannot Enter Again Even Tho I Never Entered
[Ultimate] Labyrinth Normal Raid Guide for Beginners
![[Ultimate] Labyrinth Normal Raid Guide for Beginners](https://epic7x.com/wp-content/uploads/2019/04/labyrinth-2.png)
Overview
Welcome to the normal raid guide for Labyrinth! It is the first stop game content that gives you a prissy challenge once y'all get to player rank 60 with some decent rewards. Unlike the other regular labyrinths, you demand 2 labyrinth compasses to enter information technology.
Most people will run hell raid one time they take a expert team with decent 70-85 gear. The normal raid is where yous volition farm until you can take on hell manner. Even after that, you volition still subcontract normal as the Queen drops a gratuitous hell key.
For the hell raid guide, click here.
Basics and Mechanics
You lot will need to vanquish Globe Mode 5-ix to unlock Azmakalis Raid. In raid, you lot go to take on 4 raid bosses and the Queen Azumashik. Once you have defeated 2 raid bosses, yous will unlock the top path to fight the Queen. For starters, the easiest raid boss is Arakahan. The other raid bosses'southward difficulty will depend on your team composition. Each boss has a unique mechanic that can make it very hard for certain teams if y'all don't have specific skills, buffs or debuffs. All the 5 major bosses hither are immune to stun, poison, sleep, silence (except Karkanis) and provoke.
When to Effort Normal Raid
You can attempt normal raid when your team does non dice to the mini bosses on your way to the raid bosses. The stats yous demand from your team are:
- 7000+ hp
- 500+ def
For the Queen, y'all will need:
- 10000+ hp
- 600+ def
Queen Azumashik hits a lot harder, peculiarly if any member from your team goes below 50% health. Things go downhill fast from there.
Rewards
The rewards for completing normal raid includes the following:
- Epic gear (random substats + each specific boss drops a sure ready)
- Tokens to buy shop items
- Complimentary hell raid fundamental when defeating Queen Azumashik
- Ancient Coins
Beneath are the shop items that you lot can employ tokens to purchase:
- Eye of Hyprocrisy x1
- Nightmare Mask x1
- Black Expletive Powder x1
- Azimanus Dagger (Amnesty) x1
- Azimanus Armor (Speed) x1
- Azimanus Necklace (Unity) x1
- Epic Necklace Charm x1
- Ballsy Ring Charm x1
- Queen Azumashik'south Gift x1
This is the driblet rate chances for the Azimanus Chest:
| Queen Azumashik'due south Gift | |
| Gilded Transmit Stone | 10% |
| Galaxy Bookmark x1 | 10% |
| Molagora | 15% |
| Covenant Bookmark x10 | 15% |
| Skystone x100 | 25% |
| Gold x200,000 | 25% |
I suggest purchasing the speed armor as the showtime detail as it has all the useful stats for any speed focused unit of measurement. Red charms are as well great if y'all want to upgrade your accessories quickly.
Map and Pathing
Upon inbound the map, the road to Queen Azumashik is locked until you defeat 2 raid bosses. Yous always starting time off with seventy morale. Here is how morale works.
- To a higher place 30 = +10% health bonus
- 0 to 30 = +5% wellness bonus
- -1 to -30 = No bonus
- -31 to -49 = -85% stats
- -50 = -90% stats
Each box you motility costs 1 morale. A battle costs 7 morale. Teleporting costs 3 morale.
Reddit user tlpachi has made an excellent text guide for raid. Y'all can bank check them out here. Below is the map for the normal raid:
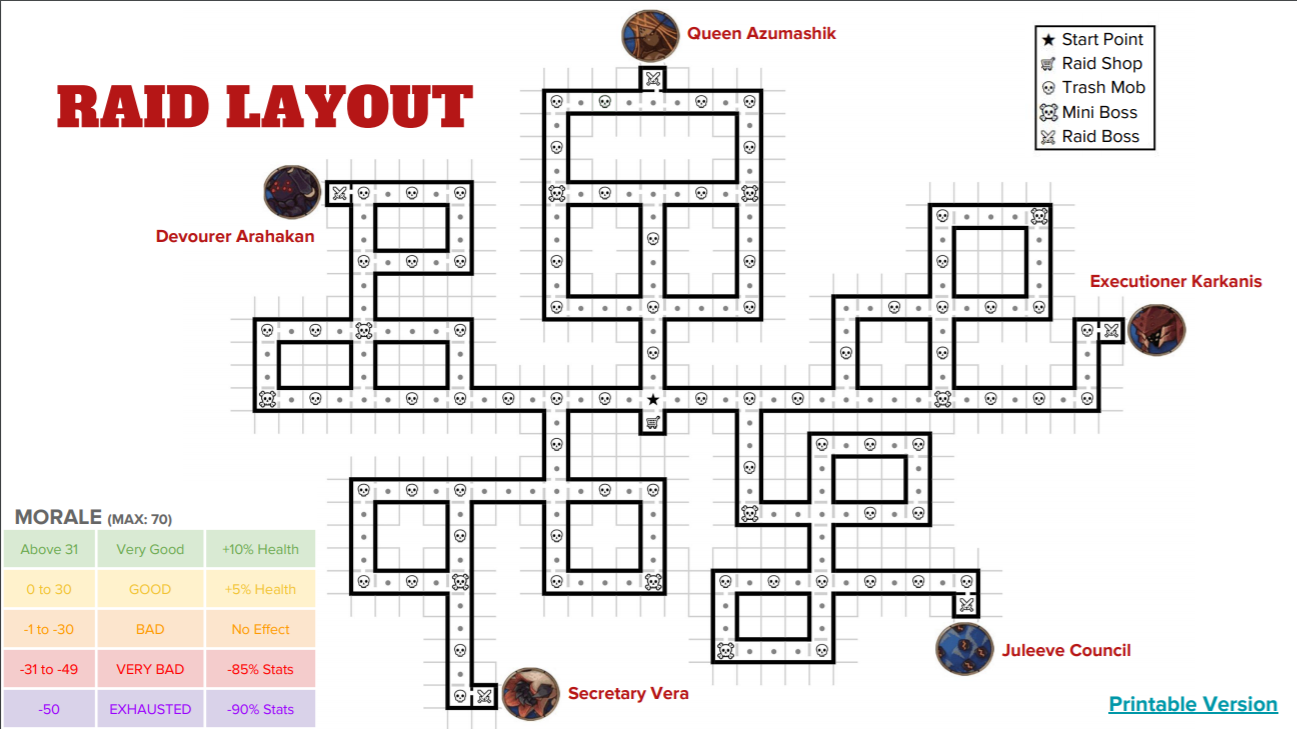
If you are just starting out, you can fight the mini bosses and trash mobs as sometimes the mini bosses can drop good imperial gear that y'all can use for your squad.
Besides, if y'all tin assemble a squad that tin at least gain 34 morale when camping, you tin can do all five bosses in three labyrinth runs, which is 6 tickets every week. The rest you can use it on regular labyrinth for more spirit stone drops to heighten your accessories.
You tin also use this wonderful site to check your top morale team -> Click here.
Devourer Arakahan

Eerie Spider
This is probably the easiest boss for most players. Drops tier 5 epic items:
- Critical Rate Fix Armor
- Assault% Rage Gear up Boots
- Unity Prepare Weapon
The boxing consists of the post-obit enemies:
- Devourer Arakahan (Nighttime Element) – ninety,000 Hp
- Azimanmus Hunter x2 (Flame Element) – 11,000 Hp initial, seven,000 Hp when summoned over again
Arakahan Skills
Crisis Response (Passive) – Caster is granted an extra turn and skill cooldowns are reduced past 3 turns if attacked when Health is less than 50%. Corrupted Web's skill cooldown is also reduced by an additional ane turn after information technology is used if Health is less than 50%.
Note:This happens when you get him to below fifty% health. He gets a total reset on all his skills, assuasive him to stun a fellow member of your team + re-summon the Azimanmus Hunters. Arky or any Guardian does non trigger this.
Incubate Venom (Passive) – Increases Attack and Speed of the Caster at the terminate of each turn. If Corrupted Web tin be used, caster is granted stackable increased Attack and Disquisitional Striking Chance.
Note: He becomes stronger as he gets to use his ultimate ofttimes. Every bit long as you take enough damage, this will non be an issue. Information technology is a DPS bank check on your team.
Opinion Chance (Passive) – If Corrupted Web can be used, grants immunity that cannot be dispelled and dramatically decreased damages received. If Corrupted Web cannot be used, all enemies are inflicted with an unable to be buffed debuff that cannot be dispelled and is not affected by immunity. Cannot receive Combat Readiness increment furnishings.
Notation: This is the abrasive office about him. Each time he uses Corrupted Spider web, he will apply an anti-buff debuff that sticks with yous for three turns until he uses Corrupted Web again. You need to time your buffs and use them on the last turn earlier he uses Corrupted Web for your buffs to piece of work.
Dash (Active) – Dashes towards the enemy and attacks,with a 75% chance to stun for 1 turn.
Annotation: This tin exist annoying if yous don't take debuff immunity. Your frontline tank will unremarkably get stunned unless he/she has loftier upshot resistance.

Corrupted Web
Corrupted Web (Active)[three Turn Cooldown] – Sprays a Corrupted Web at all enemies, decreasing Speed for 2 turns and decreasing Combat Readiness past 50%, before summoning ii Azimanmus Hunters. This skill can only be used afterward all allies except for the caster have died.
Annotation: Aside from the anti-vitrify debuff that cannot be apple-pie, you are mostly probable to become striking with the speed debuff and -50% combat readiness if your team doesn't take loftier effect resistance. A cleanser will be vital here if y'all want get a turn after the attack.
Boxing Tips
For this fight you will e'er want to clear the 2 Azimanmus Hunters first. They can employ one turn defence force break and if they all striking a single target, he/she is virtually likely dead.
At the get-go of the battle, Devourer Arakahan volition use his Corrupted Web as the opener. He has incredibly high defense and is immune to debuffs when he has Corrupted Web prepare to use. You lot won't be dealing much damage to him when that skill is up. Arky Guardian does bypass the defense though, and then you tin can apply it as the opener as well.
He loses his defence force and immunity vitrify once Corrupted Web is used. This is where yous desire to beginning attacking him to deal damage. Having 2 AoE attackers will aid you lot kill the mobs and bargain damage to him easily.
Yous volition want to showtime watching out when he is gear up to use Corrupted Web again. That will exist the turn to use all your buffs and gainsay readiness push button before he applies the anti-buff on your team.
Squad Composition
For guardian, you will want to take Arky. He ignores his defense buff to deal full percentage harm. To brand this fight easier, you want to bring an attack buffer, an AoE attacker, a defense billow and a healer. I volition exclude v star units unless it is easily obtainable. Below are some examples (F2P in heed):
AoE Aggressor
Clarissa works wonders in this fight. She has defense break and AoE impale reset, which allows her to deal even more damage. I left out air current units as they can miss. Only if yous start getting better gear, bringing someone like Bellona or Vildred won't be an issue despite elemental disadvantage.
Defense Breaker
A defense billow will make your job easier to bargain more damage. Enott is some other option but I left him out as he isn't used often.
Attack Buffer
Yuna and Hazel are the nearly F2P choices. I would suggest Hazel every bit she can specialty change to Mascot Hazel and she is used in other areas like Golem Hunt and Abyss.
Healer
Mascot Hazel will suffice hither. Montmorancy and Aither are budget choices and they can be used equally starter Wyvern Hunt 11 healers if you lot don't take Angelica. And of class, Angelica is expert here due to debuff immunity, barrier and big heals.
Secretary Vera

Miss Worm
Vera is a difficult hitting boss. Drops tier 5 epic items:
- Wellness Set Armor
- Critical Hitting Prepare Helmet
- Immunity Set Hp% Band (Best Drop)
The battle consists of 3 phases and the starting enemies are:
- Secretary Vera (Earth Element) – 105,000 Hp
- Azimanus Watcher -> Azimanus Scout (Light Element) – half-dozen,900 Hp Egg / 11,000 Hp Hatched
Here are the skills of Vera and her monsters depending on the battle phases:
Phase 1
Vera – 105,000 Hp
Mystery of Life (Passive) – Increases Attack and Speed of the caster each time an Azimanus Watcher hatches, and increases Gainsay Readiness of the caster each time an Azimanus Water takes damage.
Note: This passive means you cannot run 4 healers and auto it every bit he will become stronger over time.
Fix Evolution (Passive) – Transforms into a huge cocoon and summons two Karax Chargers if attacked when Health is less than 50%.

Spew Rock – Basic Attack that Stuns
Spew Rock (Basic Active) – Spits a pile of stones at 2 random enemies, with a 50%
chance to stun for 1 turn.
Note: This attack can be mortiferous if the stun lands on your primal healers or DPS at the wrong fourth dimension.
Incubate Egg (Active)[2 Plough Cooldown] – Summon Azimanus Watcher. If a summoned monster already exists, subtract its skill cooldown by 3 turns and grants an extra turn.
Azimanus Watcher
Hatching (Active) – Summons an Azimanus Scout and inflicts all enemies with a random debuff for 3 turns. The caster dies after using this skill.
Notation: This can be deadly if a silence lands on your healer or defense break lands on your damage dealer. If you let 3 hatch, it normally means at least i of these will happen to your team.
Phase ii
Vera (Cocoon) – 62,400 Hp
Fetal Movement (Agile) – Recovers the caster's Wellness. If the caster is already at max Health, grants continuous healing for ane turn instead.
Complete Hatching (Active)[iv Turn Cooldown] – Summons Secretary Vera with increased Attack, Defense and Speed. If the caster dies before using this skill, Secretary Vera is summoned with decreased Set on, Defense, Speed and max Health.
Note: This is a DPS check. If yous lack damage, you won't kill the cocoon in time. This means the more than powerful version will hatch and she does a lot of damage.
Karax Charger – 30,900 Hp
Headbutt – Butts the enemy, decreasing the enemy's Combat Readiness by 100%.
Note: Delays any of your team members a plough. Having skilful effect resistance or debuff immunty volition help with these. Having a combat readiness pusher also helps.
Stage iii
Vera (Hatched) – 49,000 Hp (If Killed)
Last Evolution (Passive) – Grants the caster stackable Attack, Defense, and Speed increases every turn afterward hatching from a cocoon.
Notation: Prevents you from bringing too many supports. Impairment dealers is necessary.
Spew Rock (Agile) – Spits a pile of stones at ii random enemies, with a fifty% chance to stun for 1 turn.

Boulder Vortex
Boulder Vortex (Active)[2 Turn Cooldown] – Stirs up a Boulder Vortex to set on all enemies, with a 75% risk to subtract Attack for 2 turns.
Note: This hits harder as the battle goes on.
Battle Tips
https://world wide web.youtube.com/watch?five=OO2x7eARVQk
In this battle, having the following will assistance a lot:
- Debuff Immunity
- Debuff Cleansing
- AoE Attacks
- Defence Break
- Attack Down
- Target Debuff
The goal is to have plenty damage to take Vera downwards before she re-hatch into a more powerful version. If that happens, information technology is pretty much game over. Letting the Azimanus Watcher hatch on the outset phase can also be deadly every bit they apply random debuffs on your team. This happens when you attack the eggs and it gives Vera increased gainsay readiness to get his turns faster. If all 3 hatch at the same time, the odds of your team getting wiped is loftier as defense break or silence debuff is deadly.
Debuff immunity is godlike in this fight, with cleanse coming in a close second. Having defense break helps equally you tin flare-up downwards Vera faster. You tin commencement the battle by getting rid of the hatched eggs first. Do keep in mind that if y'all attack them, Vera gains combat readiness.
Having units that tin slow Vera or decrease his gainsay readiness will be helpful here. The first phase ends when you get his hp below l%. All eggs will be destroyed if you lot haven't destroyed them.
The second phase will plough her into a cocoon and spawn 2 Karax Chargers that will reduce any target's combat readiness by 100% when they set on. They too provoke with their special ability. Their sole purpose is to delay you for iv turns until the cocoon hatches into a powerful worm in stage 3.
It is recommended to just go after the cocoon since you lot only have 4 turns to get it to 0% health. The Karax Chargers have 30k hp, so it is a waste of time to kill them unless you have crazy burst damage. As long as you take a decent DPS unit of measurement and a defence force breaker unit of measurement, yous should be able to burst it down. Debuff immunity and cleanse will exist clutch hither likewise, with debuff immunity making your life easier.
Phase 3 begins when you deplete her HP to 0 in phase two or after the dominate takes four turns. This is a DPS race every bit she volition go stronger each turn. Her AoE attack hits for a lot of damage, and so you want to make sure you have your healer gear up to sustain that. The other alternative is to outburst her down quickly so she won't get the take chances to do that every bit the boxing drags on.
Team Composition
For guardian, you volition want to take Zeaon if you don't take a reliable defense breaker. If you do, Arky will be the improve choice as yous tin can spam Arky often due to it consuming less souls.
You volition desire a team with a defense breaker, attack buffer, at to the lowest degree ane skilful DPS and a cleanser/debuff immunity support. I volition exclude 5 star units unless information technology is hands obtainable. Below are some examples (F2P in mind):
Defense Billow
Bringing water DPS (Karin/Clarissa) is not recommended equally the boss is earth element, so there volition be a 50% miss chance and therefore lowering your chance to state a defense break. Thankfully, Falconer Kluri's defence break bypasses elemental disadvantage, then you don't have to worry about missing. Withal, it can exist however be resisted.
DPS
Regular Lorina is besides viable as long as she is geared decently. She is the most commonly used DPS for many F2P players that don't take a solid DPS. Cidd is also good here as he fills the function of DPS and defence force breaker. Carminerose is a sleeper unit of measurement that is very good here. She can delay the bosses's turn due to her dull debuff and -35% to 50% combat readiness on her skill 2. She also brings her own defense and assail buff to recoup for her low wellness.
Set on Buffer
This office is optional and tin can be excluded if you have reliable defense breakers.
Hazel/Mascot Hazel is the best slot for this as she fills the role of healer and attack buffer. Pair her with any fire DPS and you deal even more damage to the boss. She as well has unhealable, which is useful in phase ii against the cocoon regen. Helga is besides and pick. She is also a viable Arena attack buffer in cleave teams due to her speed imprint. She too has a defense break on her skill 1. Yuna can also exist used here, but she won't output that much harm due to her at an elemental disadvantage.
Healer/Cleanser
F2P options include Montmorancy (AoE cleanse and debuff immunity) and Hazel for Attack Buff/Heal. If you lot don't take a reliable cleanser similar Achates, Destina or Diene, then the above options will serve you well hither. Having a Wondrous Potion Vial tin help with provoke debuff.
Executioner Karkanis

Looks like Scyther from Pokemon
A stealth monster that hits like a truck. Drops tier v epic items:
- Rage Set Armor
- Speed Set Speed Boot (Best Driblet)
- Immunity Set Helmet
The boxing consists of the following enemies:
- Executioner Karkanis (Flame Element) – 108,900 Hp
- Karax Scout x2 (Earth Element) – 71,000 Hp
Calmness (Passive) – When attacking, caster is granted stackable increased Set on and Speed. Increases adventure of evading attacks from debuffed enemies, and counterattacks following a successful evasion while dispelling any debuffs inflicted on the caster. Counterattack will brand a Critical Striking.
Note: Don't bring globe units confronting him.
Death Sentence (Passive) – Increases Attack and Speed of the caster permanently when Health falls below twoscore%. Activates Crush subsequently using Slice if cooldown of Crush is reset.

Shadow (Gains Stealth)
Shadow (Passive) – If the pulley'south Wellness is less than lxx%, caster is granted an extra turn and casts stealth for two turns at the stop of the plough. If the caster is stealthed at the offset of the turn, recovers Health and grants permanent stackable Attack and Speed increases. Stealth issue tin can simply activate once every 2 turns.
Piece (Basic Active) – Cuts the enemy, decreasing Defense for 2 turns.
Crush (Active)[2 Turn Cooldown] – Rushes towards the enemy and attacks, stunning for ii turns. If the target's Wellness is less than 50%, they will lose 99% of their electric current Wellness. If silenced, this skill will not be activated and cooldown volition be increased. The skill only activates when the pulley'south Health is less than 40%.
Note: Very deadly when your grapheme is defense debuffed.
Battle Tips
Karakanis and his minions are actually very fast and you volition need speed (about 150+ should exist expert) on your team or else you will get lapped and they terminate upward getting 2 turns earlier you get one. Having a speedy combat readiness pusher will aid hither. Arky is also the preferred guardian for outburst damage. You also demand to bring at least one AoE aggressor to suspension his stealth.
There are basically 2 phases in which Karkanis will become stronger:
- Under 70% Hp: he will stealth at the finish of every two turns. If stealthed at the start of its turn, it will heal a large amount of HP and gain a stacking assault buff.
- Under twoscore% Hp: he will gain an extra turn and use its ultimate (unless silenced). Stops going into stealth.

Hard striking basic assail + ultimate
The 2 Karax Scout are pretty much invincible so information technology is pointless to try and kill them. They can dispel up to two buffs and use attack down at a 75% take chances. Then that means your buffs will exist stripped quite often in this fight.
But focus on the boss and use the scouts as a punching purse when you are debuffed. They key gimmick hither is the dominate will counter attack at a very high chance when y'all "miss". That happens when he has elemental advantage and when any of your characters assail him while having a debuff on. His counter attacks always is a disquisitional hit and cleanses any debuff off him. His basic attack applies defense debuff for ii turns.
Once you get him to 70% health, he will offset to stealth and this is where you demand an AoE attacker to have him out of information technology. Information technology is best to bring two AoE attackers and then in instance 1 of them gets debuffed, you all the same can use the other one to go him out of stealth. If you cannot do that, and then he volition heal and become stacking attack and speed buff, making the fight harder.
When under 40% Hp, he volition use his ultimate and information technology will stun the target. If target is under l% Hp, they will be put to i% Hp. Keeping your team healthy and having near 8000 hp and about 550+ defense will aid stay above the 50% threshold.
The cardinal tip here is to get him to nearly 45% heath, activate Arky guardian to become it beneath that threshold. It volition not activate his passive + ultimate until one of your team members hit him with an assault.
Team Limerick
It is best to bring 2 AoE attackers, ane cleanser/debuff immunity support and a healer. Defense force breaker is not necessary just information technology helps. Attack down debuff is likewise useful hither to reduce the damage Karkanis deals. The Wondrous Potion Vial artifact is too useful in clearing debuffs.
I will exclude 5 star units unless it is easily obtainable. Beneath are some examples (F2P in mind):
AoE Attackers
Elson is the most budget choice. His 2d skill is an AoE attack that can do a pocket-sized heal on your squad + attack debuff on skill 1. Schuri can help with combat readiness push passive when he crits. His skill 3 tin can also pushback Karkanis when it has more than 3 focus.
Clarissa is an excellent pick here as she also has defense break on her skill 1. Axe God (Chaos Sect Axe) also fits the bill here with his AoE attack on skill 2 (with set on down debuff) and a reliable skill 3 defense break.
Rikoris, Romann, Zerato and Mercedes are as well feasible options if y'all have invested in them. They are niche units and non as pop.
Healer/Cleanser
The healer/cleansers yous use to fight Vera and Arakahan can also be used here. As mentioned earlier, having Wondrous Potion Vial on healers with no cleanse such as Mascot Hazel and Doris is really helpful in keeping the debuffs at bay. Otherwise, Montmorancy is the most budget option to go the job done as she has both AoE cleanse and a debuff immunity heal.
DPS (Optional)
Arky can help you get the task done, so any form of single target DPS is a bonus.
Commander Lorina provides pure unmarried target DPS and some combat readiness pushback. Carmainerose has more than utility and can boring down the boss. Mistychain has the cracking attack downwards debuff that tin can reduce the damage dealt by Karkanis. All the same, both Mistychain and Carmainerose have low base health, so they can be easily killed if they get targeted.
Juleeve Council

Bees!
A toxicant focused boss that can cleanse and dispel.
Drops tier 5 ballsy items:
- Assail Set Weapon
- Unity Prepare Helmet
- Speed Fix Hp% Necklace (Best Drib)
The boxing consists of 2 phases and the following bosses:
- Juleeve Quango (Light Element) – 157,300 Hp
- Juleeve Split x3 (Lite Element) – 25,600 Hp each
Black Death (Passive) – Caster splits into three when Health falls below 70% and 40%. Deals damage to all enemies proportional to the max Health of the target and dispels one buff from all enemies every time the enemy begins a plow if the core monster is not killed. When reappearing later on splitting, reappears with the 70% or 40% Health they had before splitting.
Note: AoE attacks and strong single target DPS is corking here.
Inflict Expletive (Passive) – If the caster is attacked while debuffed, grants random buffs for two turns before dispelling all debuffs. Number of buffs granted increases proportional to the number of debuffs, up to a maximum of 3 buffs.
Note: Bring characters with low debuff chance will give him less buffs.
Plague (Passive) – Poisoned enemies will poison another enemy for two turns at the outset of the turn. Effect does non occur while splitting.
Note: Wonderous Potion Vial artifact will help with the poison spreading.
Spread Disease (Active) – Attacks the enemy, inflicting poison for two turns, and granting stackable increased Attack and Speed to the caster. Grants the caster an extra set on with the same skill.

Group Attack
Grouping Deadfall (Active)[3 Turn Cooldown] – Assail all enemies, dispelling all buffs, and extending the duration of debuffs past 2 turns. Damage dealt increases proportional to the number of debuffs.
Note: This attack doesn't do big damage but it will negate any buffers you bring + extend any poison debuff past 2 turns.
Battle Tips
This battle is about heal sustain and DPS. Bringing a defense breaker is good during the split phase but not very good when fighting Juleeve in the main phase. The mutual guardian pick here is Arky, but if you don't have a defense interruption unit of measurement for the separate phase, yous can bring Zeaon.
Juleeve gets a random vitrify (Speed/Defense/Set on Up) when you debuff it + cleanses it also. The boxing will take a bit longer if Juleeve keeps getting the defense vitrify. The "cannot be buffed" debuff will preclude information technology from getting whatsoever buffs though.
Since Juleeve can always attack twice in a row and apply poison debuffs, it is vital to bring a cleanser/ debuff amnesty or a Wondrous Potion artifact. Letting the poisons stack up will brand the poison spread and go out of command if you don't articulate it. His ultimate will extend those poisonous substance debuffs. Thankfully, his bones assault doesn't injure as much as the other bosses.
The split stage will happen at seventy% and 40%. It will split up into 3 and you need to find the real 1 to brand it return back to the base course. It is random and its just a guessing game. During the spilt stage, y'all will:
- Take a small percent of the characters max wellness every bit damage later a teammate moves EACH turn (buffs also get dispelled and all teammates take impairment)
- The mini Juvleeves tin besides poison you with their attacks
As mentioned before, immunity or Wonderous Potion Vial antiquity + cleanse is highly recommended. Barrier can besides be used in the spilt phase to soak up i turn of damage. AoE damage is very adept during this phases, as is loftier burst single target damage. Equally long equally you tin can deal about 50,000 harm to 2 mini Juleeves in a 3-4 turns, yous should be able laissez passer the damage check. The longer this phase drags on, the more heal and sustain y'all need.
Once Juleeve transforms back to the original form from phase ii, it will gain more speed every bit the battle progresses.
Team Composition
Bring at least 1 healer/cleanser is recommended unless you take very potent burst harm. Buffers or Attack buffers are optional as that doesn't help during the dissever stage.
Healer/Cleanser
Any healer you bring should equip Wondrous Potion Vial if available, peculiarly Hazel/Mascot Hazel/Aither. Montmorancy is not as proficient here during the split up phase as she merely has her skill 3 unmarried target heal. Regen healers are also not equally useful due to the regen buff getting dispelled during split stage.
Attackers
Commander Lorina will again be F2P top choice. Mistychain is useful hither with skill 1 mini heals and her attacks really hurt if you geared her well.
Utility
Falconer Kluri deserves a mention here as her two% passive team heal from the specialty change skill tree will assistance reduce the overall damage taken during the split phase and the poisonous substance debuff. Her defence debuff tin too be used at will without having to worry almost debuffing big Juleeve.
Queen Azumashik

Crazy Queen
The toughest fight in the map. She hits hard and things can go bad quickly when whatever of your teammates are below 50% health.
Drops tier 5 epic items:
- Rage Ready Helmet
- Attack Gear up Atk% Necklace
- Health Set Hp% Ring (All-time Drop)
- Critical Set Weapon
Here are the enemies you volition exist facing:
- Queen Azumashik (Light Element) – 160,700 Hp
- Azimanus Watcher (Lite Chemical element) 13,200 Hp -> Devourer Arakahan (Dark Element) 24,400 Hp
- Azimanus Manager (Light Element) 13,200 Hp -> Raqix Flying Troop (Low-cal Element) 30,200 Hp
Here are the skills of the enemy:
Queen Azumashik
Queen's Servant (Passive) – After taking impairment for the first time, attacks all enemies earlier hatching ii eggs to summon ii Devourer Arahakans. If the caster'south Health is less than 50% subsequently taking damage, uses Death Trap before hatching two eggs to summon Raqix Flight Troop. Queen Azumashik absorbs some of the impairment taken by the summoned Devourer Arahakan and Raqix Flying Troop. Raqix Flying Troop has a xxx% chance to counterattack whenever Queen Azumashik takes impairment. Eggs are invincible and immune before hatching.
Note: Debuff immunity and cleanse makes information technology easier during the opening boxing.
Queen'south Terror (Passive) – Decreases the target'southward Attack, Hit Chance, and Speed equally the Wellness of enemies decreases. At the beginning of the caster's turn, stuns targets with less than 30% Wellness for 1 turn.
Note: Debuff immunity really will save y'all on this 1 when under geared.
Queen'southward Authorisation (Passive) – Grants increased Set on and Defence force for 2 turns at the start of every turn, and grants a stackable Attack increase vitrify at the end of each plough. If attacked when inflicted with more than than iii debuffs, the caster is granted an actress turn and all debuffs are dispelled.
Note: Having someone to dispel this when Queen is under 50% will assistance a lot.
Hellish Cut (Active) – Decreases the target'south Attack, Hit Gamble, and Speed as the Wellness of enemies decreases. At the first of the caster'due south turn, stuns targets with less than 30% Health for one plow.

Death Trap
Expiry Trap (Active)[ii Plough Cooldown] – Attack all enemies, inflicting stackable Defense and Speed decreases. Damage dealt increases proportional to the caster's lost Wellness. This skill can only exist used when the caster's Health is less than fifty%.
Annotation: This hurts as the boxing progresses.
Battle Tips
This is the toughest fight in the normal raid. Queen Azumashik hits hard and has a lot of mechanics yous have to pay attention to compared to the other bosses. Allow'southward suspension down the various phases and mechanics:
- The battle starts with her and 4 eggs unhatched and they are invincibile
- The bottom two eggs are Devourer Arakahans that can stun you (hatches after you hit the Queen for the first time)
- When the Queen gets to less than 50% health, she gets an extra plow, cleanses all debuffs and uses her ultimate AoE set on on the team.
- The summit two eggs are Raqix Flying Troops that hatch once Queen goes below l% wellness
- When eggs hatch, they utilise random debuffs on your unabridged team
- The max number of debuffs you can land on the Queen is 3. She will cleanse it and get an extra plough after that.
- Each fourth dimension she attacks, she gets a 2 turn assail and defence buff, which is problematic when stacked with her stackable set on passive.
The all-time guardian for this fight is Arky. If you lot don't take enough burst damage, he will come up in handy when the Queen is nether 50% health.
The first stage of the fight is when the Queen is at 100% health and the second stage starts when you become her below 50%.
Debuff amnesty and cleanse are 2 key skills yous need here to make your life easier. Having a strong tank that can accept hits is also a bonus for survival. Attacking the 2 Devourer Arakahans will also harm the Queen. You have a few decisions to make hither in terms of battle strategy:
- Go straight for the Queen and ignore the minions
- Kill the two Devourer Arakahans, and then focus on the Queen
- Impale all minions and focus on the Queen
I advise simply going for the Queen if you have plenty DPS to burst her down in iii-4 turns when she is beneath 50% hp and at the same fourth dimension existence able to take hits from the Devourer Arakahan'south and the counter attacks from Raqix Flight Troops.
Before attacking the Queen at the commencement of the battle, it is vital to have either debuff immunity or cleanse ready equally the hatching of the Devourer Arakahans will apply random debuffs on your entire squad.
It is a lot safer to kill the two Devourer Arakahans equally they can stun you every 3 turns. Information technology can exist deadly aslope all the Queen's attacks. Since the Queen will attack the frontline tank most of the time and dispel buffs + reducing tank's skill cooldown by ane, it is safer to bring at to the lowest degree 1 other healer if y'all choose to use a healer as the tank. Keeping everyone above fifty% health will ensure the Queen does not get any additional surprise AoE attacks.
You also have to pay attention to the Queen when she reaches fifty% health. She will hatch the 2 remaining eggs and they will apply random debuffs on your entire squad + use her ultimate. If you are unlucky and any of your members get the defense debuff, they will most likely take lethal damage. The Raqix Troops will counter set on that can poison if you attack the Queen.
Equally long as you lot can proceed anybody above 30% health, you will avoid whatever of your characters getting stunned and take an additional AoE set on from a Queen basic attack. Immunity buff also stops that from happening. Having high effect resistance(50%+) will aid y'all resist more debuffs, but it can be very random.
Team Composition
Your squad limerick will depend on how well geared your DPS units are. With a strong DPS that can output 20k damage when the Queen is defense broken, you can get away with but bringing one DPS.
Ideally, information technology is best to bring at least one defense billow, a team attack buffer, a DPS and some other support healer. Having a dispeller to strip the Queen's buff or utilise attack down debuff will help reduce the damage your team takes. Having Aurius on a tank will also mitigate some damage for your team.
A F2P team volition await something like this:
If Kluri is tanking, then be aware that your defense force suspension will non be as reliable due to Queen constantly resetting Kluri's skill cooldown. Mascot Hazel has moderate heal and the team attack buff for the principal DPS Lorina. Defense break becomes vital when Queen drops beneath 50% wellness. With assault buff and defense break, as long as your Lorina can do 15k+ damage, adding Arky 3 times will be able to accept her down.
Now allow's get over the other options (excluding 5 star units):
Tank Frontline
Pyllis is another alternative due to her passive. Getting striking 4 times will prompt an automobile cast of squad defense buff. Her ultimate will give your entire team a barrier, which is useful in mitigating some harm against Queen'southward AoE assault. Check out this video of Pyllis tanking the Queen.
Healer/Cleanser
Angelica would be the best here due to how skilful her debuff immunity is. However, Achates or Montmorancy can practice the job sufficiently due to their low cooldown squad cleanse. I personally utilise Achates to tank. Doris is i of the healers with team defense buff. If you just have Hazel/Mascot Hazel, then having the Wondrous Potion Vial here actually helps out with the debuffs.
DPS
Again, Commander Lorina is the easiest choice for F2P players. An alternative option would be Taranor Guard as he has defense force break and besides a useful member in Wyvern 11.
Clarissa and Karin are strong water DPS, where one is AoE while the other is single target respectively. Both of them also have defense intermission.
Chaos Sect Axe is also very versatile as he is also great against the other mini bosses due to him non having elemental disadvantage and brings defense intermission and AoE set on down.
Buffers
Mascot Hazel is also a healer so she is very good here. Helga is another culling if you lot use her in Banshee or in the Arena cleave team.
Yuna is a good substitute if you lot don't have Diene and want an offensive AoE attacker. Her AoE attacks does come in handy here. Still, you volition need to brand sure you bring strong supports or healers to make sure Yuna survives the Queen's harm.
Dispeller (Optional)
Not necessary simply it can help mitigate harm by stripping the Queen'due south attack and defense force buff. Information technology is best to use someone with a dispel that has low cooldown since the Queen gets her buff every plough.
Sources
- https://world wide web.reddit.com/r/EpicSeven/comments/aj2xzv/azmakalis_raid_text_guide/
- Grass Angel
Source: https://epic7x.com/ultimate-labyrinth-normal-raid-guide-for-beginners/
0 Response to "Epic Seven Azmakalis Says Cannot Enter Again Even Tho I Never Entered"
Post a Comment